哈希表的实现与常见操作
前段时间基于数组和单链表以拉链法写了个哈希表,实现了基本的增删改查(CRUD),以键值对的形式存储一些配置参数,便以此文记录一下。
数据结构
#define TABLE_SIZE 101
#define KEY_SIZE 32
#define VALUE_SIZE 128
#define BUF_SIZE 256

#define DATA_PATH "data.txt"

struct linklist {
    char key[KEY_SIZE];
    char val[VALUE_SIZE];
    struct linklist *next;
};
struct linklist *hashtbl[TABLE_SIZE];
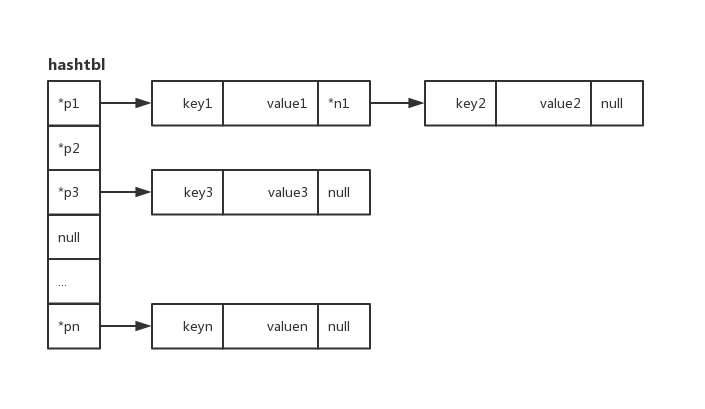
简单起见,使用两个字符数组分别用于存储键key和值value,每个键值对都以单链表linklist的一个节点形式存储。哈希表hashtbl数组存储每个单链表的头部指针head。

哈希函数
对于字符串的哈希函数,我选择了《算法》第4版提供的一种叫 Horner 的经典算法,用 N 次乘法、加法和取余来计算一个字符串的散列值。注意书中的算法实现均采用java语言↓
hash = (R * hash + s.charAt(i)) % M;
其中,R是一个素数,只要其足够小,就能保证hash在(0~M-1)之内。这里设R为31,M即哈希表的长度,下面就是根据以上算法实现的一个字符串哈希函数。
/* calc hash code of string */
uint32_t hash(char *key) {
    int len = strlen(key);
    int i;
    uint32_t ret = 0;

    if(!len)
        return -1;

    for(i=0; i < len; i++) {
        ret = (ret * 31 + (uint32_t)key[i]) % TABLE_SIZE;
    }

    return ret;
}
字符串的哈希函数还有很多,具体可以参考字符串哈希函数
增删改查
上面定义好了哈希表的存储方式,以及字符串的哈希函数,下面便可以逐个实现对哈希表的增删改查。
set
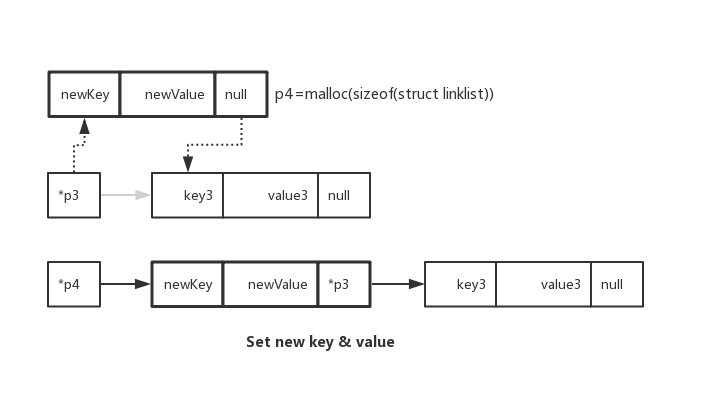
首先实现哈希表元素的增添或更改:
- 计算待插入或更新键的哈希值
- 遍历哈希值所在链表,判断当前键是否已存在
- 若键不存在,则在表头插入新键;若已存在,则更新键值
插入新键时使用malloc分配内存,同时更新所在链表的表头

/* set or update value of key to hash table */
int set(char *key, char *val) {
    uint32_t i;
    struct linklist *l, *n;

    if(!key || !val)
        return -1;

    i = hash(key);

    for(l = hashtbl[i]; l && strcmp(key, l->key); l = l->next);

    if(l)
        strcpy(l->val, val);
    else {
        n = malloc(sizeof(struct linklist));
        if(!n)
            return -1;

        strcpy(n->key, key);
        strcpy(n->val, val);

        /* insert new key to the head of linklist */
        n->next = hashtbl[i];
        hashtbl[i] = n;
    }

    return 0;
}
unset
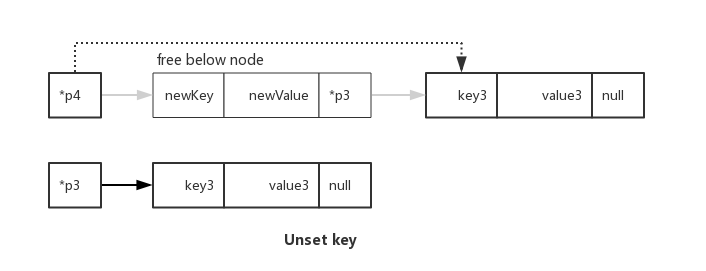
对键的删除其实就是对一块内存的释放,先计算哈希值,遍历链表找到待删除的键,最后free即可。

这里需要考虑的一个问题是如果待删除键值对l是表头后第一个节点,需要将链表表头指针直接指向l->next。
/* remove key from hash table */
int unset(char *key) {
    uint32_t i;
    struct linklist *l, *prev;

    if(!key)
        return -1;

    i = hash(key);

    for(prev = hashtbl[i], l = prev; l && strcmp(key, l->key); prev = l, l = l->next);

    if(l) {
        if (l == prev)
            hashtbl[i] = l->next;
        else
            prev->next = l->next;
        free(l);
    }

    return 0;
}
get
获取键值就非常简单了,计算哈希值后直接遍历链表即可。
/* get value of key from hash table */
char* get(char *key) {
    uint32_t i;
    struct linklist * l;

    if(!key)
        return NULL;

    i = hash(key);

    for(l = hashtbl[i]; l && strcmp(key, l->key); l = l->next);

    return l ? l->val : NULL;
}
其它操作
show
show函数用于显示哈希表当前存储的所有数据,实现方法即循环遍历哈希表,然后打印出每个链表节点存储的键值对。每行打印一组键值对,并且键值对之前会打印出当前键对应的哈希函数计算结果。
/* show all the keys & values of hash table */
void show() {
    int i;
    struct linklist *l;

    __nprintf("---------------------------------------");
    for(i = 0; i < TABLE_SIZE; i++)
        for(l = hashtbl[i]; l != NULL; l = l->next)
            __nprintf("%d\t%s=\"%s\"", hash(l->key), l->key, l->val);
    __nprintf("---------------------------------------");
}
函数中用到的__nprintf函数如下,是通过向终端/dev/tty写入数据完成对数据的终端显示,注意不同操作系统的终端设备路径可能不太一样,例如嵌入式Linux系统可能使用的是dev/console.
/* use this '__nprintf' to print message */
void __nprintf(const char *fmt, ...) {
    va_list ap;
    static FILE *filp;

    if ((filp == NULL) && (filp = fopen("/dev/tty", "a")) == NULL)
        return;

    va_start(ap, fmt);
    vfprintf(filp, fmt, ap);
    fputs("\n", filp);
    va_end(ap);
}
commit
除了将数据显示在终端外,还可以通过下面的commit函数将数据存入文件当中,该文件就可以充当最简易的数据库。
/* save all keys & values from memory to local file */
int commit() {
    int i;
    struct linklist *l;
    char buf[BUF_SIZE];
    FILE *fp;

    fp = fopen(DATA_PATH, "w");

    if(!fp)
        return -1;

    for(i = 0; i < TABLE_SIZE; i++) {
        for(l = hashtbl[i]; l != NULL; l = l->next) {
            snprintf(buf, BUF_SIZE, "%s=\"%s\"\n", l->key, l->val);
            fputs(buf, fp);
        }
    }

    fclose(fp);
    return 0;
}
load
既然上面提到了数据存储,那自然就少不了数据读取,将存入文件的数据加载到内存当中,作为进程启动的首个任务,这便是load函数所完成的工作。
/* load keys & values from local file to memory */
int load() {
    int i;
    struct linklist *l;
    char buf[BUF_SIZE]={0};
    char *key, *val;
    FILE *fp;

    fp = fopen(DATA_PATH, "r");

    if(!fp)
        return -1;

    while(fgets(buf, BUF_SIZE, fp)) {
        key = strtok(buf, "=");
        val = strtok(NULL, "\"\n");
        set(key, val);
    }

    fclose(fp);
    return 0;
}
至此,与哈希表的基本操作函数都已实现,下面将使用这些基本函数实现对哈希表的一些常见操作↓
应用实例
hash
下面实现一个hash程序,对哈希表进行交互式操作,程序主要内容如下:
- 启动时加载存储文件中的数据到哈希表
- 从终端不断获取用户指令,完成数据的增删改查与存储,以及程序的帮助信息及退出
#include "hash.h"

static void help() {
    __nprintf("  help \t\t--show this infomation\n" \
          "  set key val \t--set or update value of key\n" \
          "  unset key \t--remove key from hash table\n" \
          "  get key \t--show value of key\n" \
          "  show \t\t--show all keys & values of hash table\n" \
          "  commit \t--write all keys & values to local file\n" \
          "  exit \t\t--exit current session"
          );
}

int main(int argc, char *argv[]) {
    char cmd[128]={0};
    char *action, *key, *val;

    load();
    while(1) {
        printf("CMD> ");
        gets(cmd);

        key = NULL;
        val = NULL;

        action = strtok(cmd, " ");
        if(!action)
            continue;

        if(!strcmp(action, "set")) {
            key = strtok(NULL, " ");
            val = strtok(NULL, "\n");
            set(key, val);
        }
               else if (!strcmp(action, "unset")) {
            key = strtok(NULL, " ");
            unset(key);
        }
        else if (!strcmp(action, "get")) {
            key = strtok(NULL, " ");
            val = get(key);
            if(val)
                __nprintf("%s=\"%s\"", key, val);
        }
        else if (!strcmp(action, "show"))
            show();
        else if (!strcmp(action, "commit"))
            commit();
        else if (!strcmp(action, "help"))
            help();
        else if (!strcmp(action, "exit")) {
            commit();
            break;
        }
        else {
            __nprintf("unknown cmd, try help!");
            continue;
        }
    }
}
编译后应用示例如下:
➜  hash git:(master) ./hash
CMD> help
  help          --show this infomation
  set key val   --set or update value of key
  unset key     --remove key from hash table
  get key       --show value of key
  show          --show all keys & values of hash table
  commit        --write all keys & values to local file
  exit          --exit current session
CMD> set id 1234
CMD> show
---------------------------------------
22      id="1234"
---------------------------------------
CMD> get id
id="1234"
CMD>
CMD> set username litreily
CMD> set password 123456
CMD> show
---------------------------------------
22      id="1234"
79      password="123456"
88      username="litreily"
---------------------------------------
CMD> unset password
CMD> show
---------------------------------------
22      id="1234"
88      username="litreily"
---------------------------------------
CMD> commit
CMD> exit
➜  hash git:(master)
test
除了交互式程序hash外,我还写了一个测试用例,用于生成100组随机键值对,键值对由随机长度及字符组成,最终得到的哈希表将存入本地文件data.txt中。
#include <time.h>
#include "hash.h"

#define MAX_KEYS 1024
static const char * key_pool = "abcdefghijklmnopqrstuvwxyz_";
static const char * val_pool = "abcdefghijklmnopqrstuvwxyz_0123456789 .";

void set_rand_key() {
    int key_maxlen = strlen(key_pool);
    int val_maxlen = strlen(val_pool);
    char key[32] = {0};
    char val[128] = {0};
    int key_len, val_len, i;

    key_len = 1 + rand() % 16;
    val_len = 4 + rand() % 50;

    for(i = 0; i < key_len; i++)
        key[i] = key_pool[rand() % key_maxlen];

    for(i = 0; i < val_len; i++)
        val[i] = val_pool[rand() % val_maxlen];

    set(key, val);
}

int main(int argc, char *argv[]) {
    int i;
    int test_times = argc > 1? atoi(argv[1]) : MAX_KEYS;

    srand((uint32_t)time(NULL));
    for(i = 0; i < test_times; i++)
        set_rand_key();
    commit();

    show();

    return 0;
}
该测试用例也可以大致用来测试哈希函数的可靠性,只要看数据中每个键值对前面的哈希值是否均匀分布即可,实践证明是均匀分布的,这里不再给出测试过程。
libhash.so
在复习哈希函数的同时,顺便复习了下动态链接库的生成和使用,要把hash.c编译成链接库libhash.so,可以使用以下编译语句
gcc -fPIC -c hash.c
gcc -shared -o libhash.so hash.o
其中的shared用于指定生成动态链接库。
在使用动态链接库时,需要让使用库文件的程序访问该库,有以下方法:
- 将动态链接库拷贝到系统环境变量包含的路径中,如
/usr/lib - 将动态链接库所在路径添加到环境变量
- 修改变量
LD_LIBRARY_PATH,将动态链接库的路径添加其中
下面举一个很简单的例子,demo.c
#include <stdio.h>
#include <stdint.h>

extern void __nprintf(const char *fmt, ...);
extern uint32_t hash(char *key);
extern char* get(char *key);
extern int set(char *key, char *val);
extern int unset(char *key);
extern int commit();
extern int load();
extern void show();

int main(int argc, char *argv[]) {
    __nprintf("start");
    load();
    show();
    __nprintf("end");
    return 0;
}
代码很简单,就是完成哈希表的导入与显示,编译语句如下:
gcc -fPIC demo.c -o demo -L. -lhash
其中,-L.代表从当前目录寻找链接库,-lhash代表链接到库libhash.so,注意前缀lib及后缀.so是自动添加的,编译语句中无需添加。
Makefile
如果将以上所有程序一起编译,就需要编写Makefile如下
.PHONY: all clean

all: hash test libhash.so demo

CC=gcc
CFLAGS=-fPIC

%.o: %.c
    $(CC) $(CFLAGS) -c $<

hash: main.o hash.o
    $(CC) -o $@ $^

test: test.o hash.o
    $(CC) -o $@ $^

libhash.so: hash.o
    $(CC) -shared -o $@ $^

demo: demo.o
    $(CC) $^ -o $@ -L. -lhash

clean:
    rm -rf *.o hash test libhash.so demo
小结
本文主要讲述了哈希表的简单实现方法及其常见操作,然后通过几个简单例子说明了使用方法,最后顺道说了一下动态链接库的生成及使用方法。
版权声明:本博客所有文章除特殊声明外,均采用 CC BY-NC 4.0 许可协议。转载请注明出处 litreily的博客!